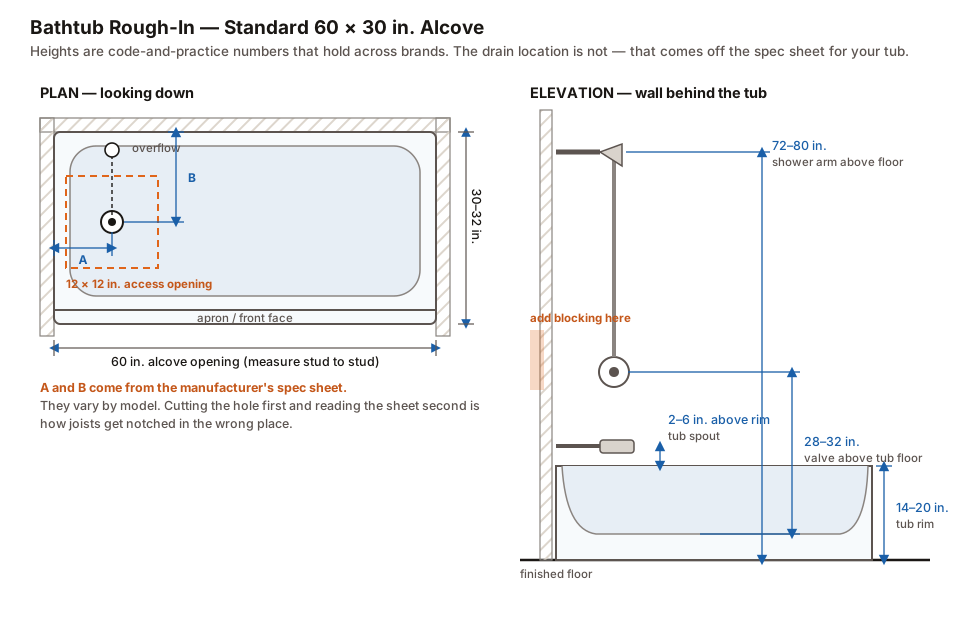
Rough-in is the stage where mistakes are cheap to make and expensive to find. Everything here happens before the tub is set, before the wall board goes up, and before the tile — which is why a drain hole cut in the wrong place is a genuinely bad afternoon.
One thing to have on site before you start: the waste and overflow kit for the tub you’re installing. It almost never ships with the tub, and discovering that on the day you’ve got the floor open is how a weekend job turns into two.
The Numbers That Hold Across Brands
Some rough-in dimensions are effectively universal because they come from code, ergonomics or the sheer weight of convention. These are the ones you can plan around before you have chosen a tub.
| Dimension | Typical |
|---|---|
| Alcove opening, stud to stud | 60 in. |
| Alcove depth | 30–32 in. |
| Tub rim above finished floor | 14–20 in. |
| Valve above the tub floor | 28–32 in. |
| Tub spout above the rim | 2–6 in. |
| Shower arm above finished floor | 72–80 in. |
| Drain and trap arm | 1½ in., ¼ in. per ft. fall |
The 60-inch alcove is the one number that dominates American bathrooms. It is why a standard tub is 60 inches long, and it is why a bathroom built to that dimension gives you a wide choice of replacements.
The Number That Does Not
The drain location within the alcove is the exception, and it is the one people assume is standard.
It is not. Manufacturers place the waste outlet in different spots — different distances from the end wall and different offsets from the back wall — and the differences are big enough to matter when you are cutting a hole in a subfloor with joists under it.
Get the spec sheet for the exact model before you cut anything. Every manufacturer publishes one, it is free, and it has the drain dimension called out.
The Access Opening
At the drain end, cut roughly a twelve inch square opening in the subfloor, centered on where the waste outlet will land.
That opening is not for the drain pipe. It is so you can get a hand and a wrench onto the shoe, the tee and the trap after the tub is sitting in place. You cannot assemble a waste and overflow from above, and once the tub is set you cannot reach it from anywhere else.
Cut it too small and the connections cannot be made, which means lifting the tub back out — an unpleasant discovery on a cast iron tub.
Watch the joists. If the drain lands over one, that is a framing conversation and not something to solve with a reciprocating saw. Notching a joist bottom or drilling near its edge is how floors start bouncing.
Heights on the Wall
The elevation view is the part people improvise, and improvising is fine within limits.
Valve at 28–32 inches above the tub floor. Reachable standing in the shower and reachable leaning over the rim to run a bath. Move it if the household has a reason to — a seated user, an unusually tall one — it is not a code dimension.
Spout 2–6 inches above the rim. The important constraint is that the spout outlet must sit above the flood rim of the tub, so a backflow situation cannot draw bath water into the supply. Keeping it clear of the rim also means you can get a bucket under it.
Shower arm at 72–80 inches. Seventy-eight is the common default. Go higher for a tall household, but check that the spray still lands inside the tub — an arm set high with a fixed head can put water on the far side of the curtain.
Blocking: The Step That Gets Skipped
Before the wall board goes on, add blocking behind the valve and behind the tub’s nailing flange.
Behind the valve, so the valve body is fixed and does not move when someone turns it. A valve floating on its supply lines works loose over years and eventually starts leaking inside the wall.
At the flange, so the tub can be screwed or nailed off properly.
Wherever a grab bar might ever go. Blocking costs a two-by-six and five minutes at rough-in. Adding it later means opening a tiled wall. Put it in even if nobody needs a bar today.
Setting the Tub Itself
Rough-in is not just plumbing. Two things about the tub matter here.
Level, or deliberately not. The tub gets set level side to side. Front to back, the tub’s own floor carries the slope to the drain — you do not tilt the tub to make it drain. If a tub has to be shimmed, shim it to level and let the fixture do its job.
Support underneath. Most fiberglass and acrylic tubs need a mortar bed or the manufacturer’s specified support under the base. Without it, the floor flexes underfoot, which is unnerving and eventually cracks the finish. Cast iron does not need it; almost everything else does.
Tools Worth Having Staged
A drain key — also sold as a dumbbell wrench or tub drain extractor — is the tool that makes the strainer install possible. Pliers on the crossbars will break them, and a broken crossbar on a brand new drain is a bad way to start, so have one of those in the box before the tub goes in.
Beyond that it’s a four-foot level long enough to span the tub rim, and a tape you trust. Setting a tub level side to side is the difference between a job that looks right and one that quietly annoys someone for a decade.
Replacing Rather Than Building New
Most tub work is a replacement, not a new build, which changes the sequence.
Measure the existing alcove first, stud to stud, before you shop. Not every 60-inch tub fits every 60-inch opening once you account for wall board thickness and squareness.
Check the drain end. Tubs come in left-hand and right-hand drain. Ordering the wrong hand is one of the most common and most avoidable errors in this whole job.
Compare the new tub’s drain dimension to what is in the floor. If they match, the plumbing may be reusable. If they do not, plan on opening the floor.
Old tile is coming off regardless. The tub’s flange sits behind the wall surface, so the bottom courses have to go. This is covered in more detail in does removing a bathtub destroy the tile — and it is a real part of the reason refinishing is sometimes the better call.
Bottom Line
Everything except the drain location is predictable, and the drain location is the one thing worth being pedantic about. Pull the spec sheet, mark the hole from that, cut twelve inches square, and check where the joists are before the saw comes out.
Add the blocking while the wall is open. It is the cheapest thing you will ever do in a bathroom and the most expensive thing to add later.
Keep Reading
- Bathtub Drain Diagram: Every Part, Labeled and Explained — what goes in the hole you just cut
- Tub Drain Assembly Parts Explained — every piece of the waste and overflow, numbered
- Bath Waste and Trap Fittings — the four joint types you will make under that tub
- Does Removing a Bathtub Destroy the Tile Around It? — plan the wall before you plan the plumbing
- Refinish or Replace a Tub — Which Is Best? — the decision that comes before all of this
Common Questions
What is the standard rough-in for a bathtub?
A standard alcove tub needs a 60 inch opening measured stud to stud and 30 to 32 inches of depth. The tub rim ends up 14 to 20 inches above the finished floor depending on the model. The drain location within that opening is the one dimension that is not standard — it varies by manufacturer and has to come from the spec sheet for the specific tub.
How high should a tub and shower valve be?
Twenty-eight to thirty-two inches above the floor of the tub is the usual range, which puts it comfortably within reach from both standing and seated. It is a practice number, not a code number, so it can move to suit the household — but keep it well below the shower arm and above the tub rim.
How high should a shower arm be?
Seventy-two to eighty inches above the finished floor, with seventy-eight being the most common. Higher suits a taller household; the constraint is that the head has to clear the tallest user with the water still landing inside the tub.
How big should the access hole in the subfloor be?
About twelve inches square at the drain end, centered on the tub's waste outlet. That is enough to reach the shoe, the tee and the trap connections after the tub is set. Cutting it undersized is a common and costly mistake because the tub has to come back out to enlarge it.
Can I reuse the existing plumbing when replacing a bathtub?
Sometimes, if the new tub is the same size from the same general family and its drain outlet lands in the same place. Check the new tub's spec sheet against what is actually in the floor before you demolish anything — a drain that is off by even three inches means opening the floor.
Does a bathtub drain need to be vented?
Yes. Without a vent the trap siphons itself dry each time the tub empties and you get sewer smell in the bathroom. The vent has to connect above the trap weir, and the distance from the trap to the vent is limited by pipe size.
How big should the subfloor opening be?
About 12 inches square at the drain end, centered on the waste outlet.
Does the drain need a vent?
Yes. Without one the trap siphons dry and the bathroom smells.
Left hand or right hand drain?
Stand facing the tub from the room. The end the drain is on is the hand. Get this wrong and nothing else fits.