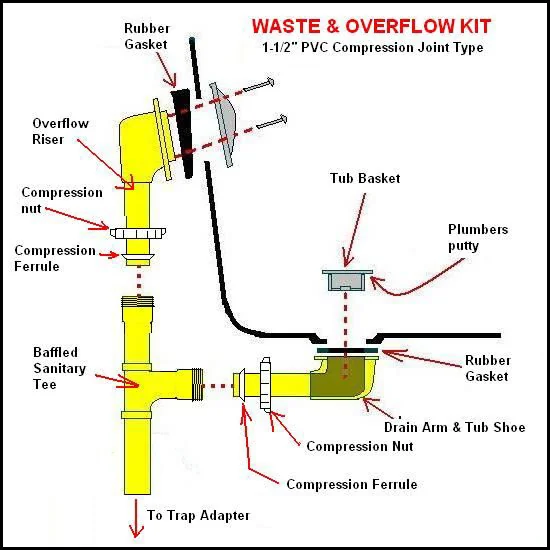
If you’re standing in front of an open access panel trying to work out what connects to what, this page is a map. Below is the complete bathtub drain assembly, labeled part by part, followed by what each piece does and where it fails.
Every bathtub drain in a typical American home is the same handful of parts in the same arrangement. Once you can name them, ordering the right replacement gets a lot easier — and if you’re pulling the drain today rather than just identifying it, the one tool you can’t improvise is a drain key. It grips the crossbars inside the strainer so they don’t snap off, which is the failure that turns a twenty-minute job into a two-hour one.
A 1½” compression-joint waste and overflow kit — the arrangement found under most American bathtubs.
The Complete Assembly, Top to Bottom
1. Strainer flange (the drain you see). The chrome ring in the bottom of the tub. It threads into the drain shoe below and is sealed to the tub with plumber’s putty or a rubber gasket.
2. Drain shoe. The fitting directly under the tub that the strainer threads into. It has a gasket that seals against the underside of the tub floor. This is the part that leaks when someone forgets which way the beveled gasket faces.
3. Overflow plate. The round or oval cover on the tub wall near the top, usually with a lever or a screw. It covers the overflow opening and, on trip-lever tubs, houses the linkage.
4. Overflow tube. The vertical pipe running from the overflow opening down to the tee. Its job is to carry water away if the tub overfills, so it must stay open — never plug it.
5. Tee fitting. Where the overflow tube meets the horizontal run from the drain shoe. Everything above joins here.
6. Tailpiece. The short vertical pipe dropping from the tee to the trap.
7. P-trap. The U-shaped bend that holds a plug of water. That water seal is what stops sewer gas from coming up into your bathroom. It is not optional and it is not a place to save money.
8. Trap arm. The horizontal pipe from the trap to the branch drain in the wall or floor. It needs a slight fall — about a quarter inch per foot — and it must be vented downstream.
The whole assembly from strainer to trap arm is usually 1½-inch pipe on a bathtub. Sinks use 1¼-inch, which is why sink parts don’t fit tubs.
The trap, in detail
The trap has more named parts than people expect, and the names matter when you’re reading code or ordering fittings.
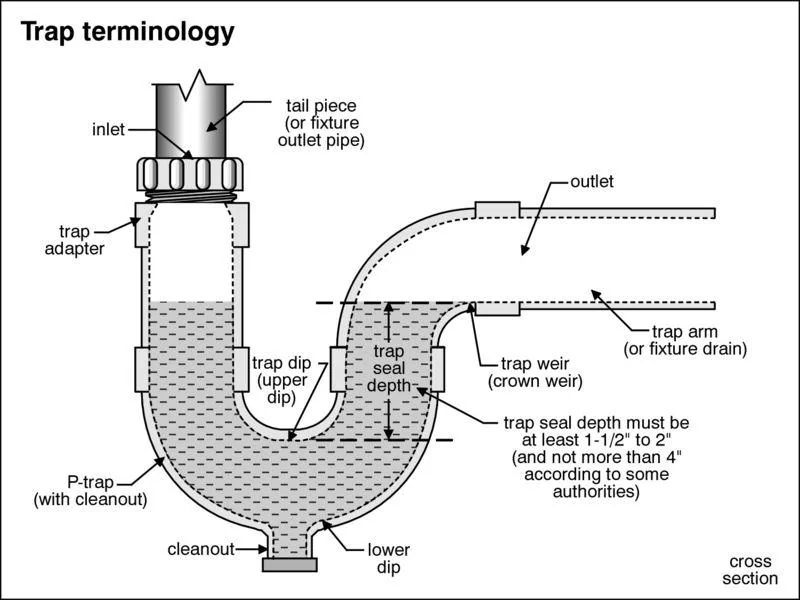
The trap seal depth is the vertical distance between the trap dip and the trap weir — that’s the actual plug of water doing the work. Code generally requires between 2 and 4 inches. Too shallow and it evaporates or siphons away; too deep and the trap becomes self-scouring in a way that traps solids.
The trap arm runs from the weir to the vented branch drain. If that arm is too long, the trap siphons itself dry every time the tub empties, and you get sewer smell in the bathroom with no visible leak anywhere.
How the Overflow Actually Works
This confuses a lot of people, so it’s worth being precise.
The overflow is not a second drain that helps the tub empty faster. It’s a safety bypass. When the water level reaches the overflow opening, water goes in there and joins the drain line below the stopper — which means the tub can’t flood the bathroom even if you walk away with the tap running and the stopper closed.
On trip-lever tubs, the overflow opening does double duty: the linkage that operates the stopper runs down through it. That’s why the overflow plate on those tubs has a lever on it.
Because the overflow tee sits below the tub rim but above the trap, a leak there drips inside the wall or under the floor rather than into the tub. Overflow gaskets are one of the most common sources of the mystery ceiling stain in the room below a bathroom.
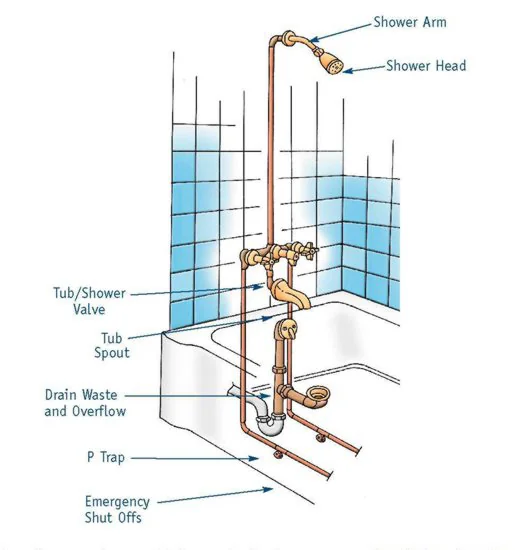
How the drain assembly sits within the whole tub and shower system — supply on the left, waste and overflow on the right, trap below.
Which Stopper Do You Have?
Five common types. Identifying yours determines what you can replace and how it comes apart.
Trip lever (plunger). Lever on the overflow plate. There’s no visible stopper in the drain — a brass plunger inside the overflow tube rises and falls to block the flow. Common in older homes. When it stops holding water, the linkage usually needs adjustment rather than replacement.
Pop-up. Lever on the overflow plate, plus a visible stopper in the drain opening. The linkage rocks the stopper up and down. Wears at the rocker arm.
Lift-and-turn. Stopper sits in the drain with a small knob on top. You lift it and rotate it to lock it open or closed. Held on by a single setscrew under the knob.
Toe-touch (foot lock). Push down with your toe to close, push again to open. Spring-loaded. No overflow linkage. Unscrews from the drain crossbar.
Push-pull. Similar to lift-and-turn but you just pull up and push down without rotating.
The last three all thread directly into the drain shoe or its crossbar, which means you can swap between them freely. The first two involve linkage in the overflow tube, so changing away from them means pulling the overflow assembly.
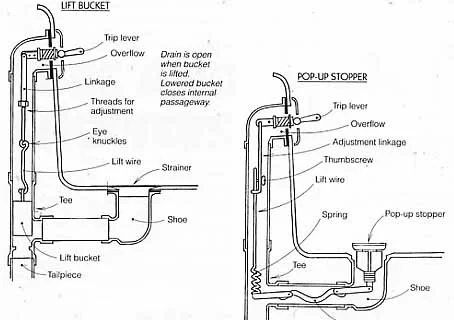
The two linkage-driven types compared. On the lift bucket (left) the drain is open when the bucket is lifted — a lowered bucket closes the internal passageway. The pop-up (right) uses the same trip lever to rock a visible stopper.
Adjusting the linkage
If your tub won’t hold water, or won’t drain fully, the linkage is almost always the cause and almost never needs replacing — it needs adjusting.
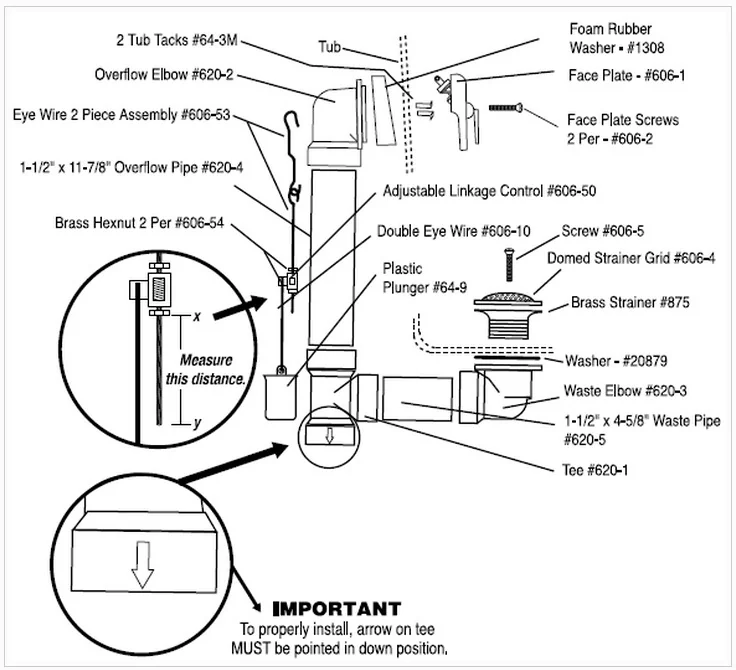
The linkage rod has a threaded adjustment in the middle. Lengthening it drops the plunger further down the overflow tube, which seals better. Shortening it lifts the plunger clear so the tub drains faster. Pull the overflow plate off, lift the whole assembly out, turn the adjustment a few threads, and reinstall — you’ll usually get it in two tries.
One detail worth catching before you reassemble: the tee has an arrow on it, and that arrow must point down. Install the tee upside down and the assembly will leak no matter how well everything else is fitted. It is an easy mistake and a miserable one to find later.
Where These Assemblies Fail
At the shoe gasket. The rubber gasket between the drain shoe and the underside of the tub hardens with age and stops sealing. Symptom: water under the tub only when the tub is full, not when it’s just running.
At the overflow gasket. Same idea, higher up. Symptom: leaking only when the tub is filled past the overflow plate.
At the strainer putty. If the plumber’s putty under the flange has dried and shrunk, water seeps around the drain body. Symptom: a slow leak whenever the tub holds water.
At the trap. Plastic traps crack, slip joints loosen, and old metal traps corrode through at the bottom of the bend. Symptom: dripping directly under the tub during and after draining.
Linkage out of adjustment. Not a leak, but the most common complaint — the tub won’t hold water, or won’t drain fully. On trip-lever assemblies the linkage rod has a threaded adjustment; lengthening it drops the plunger further and improves the seal.
Tools and Parts
Here’s the whole assembly exploded, which is the view you want when you’re deciding whether to replace one gasket or the entire kit.
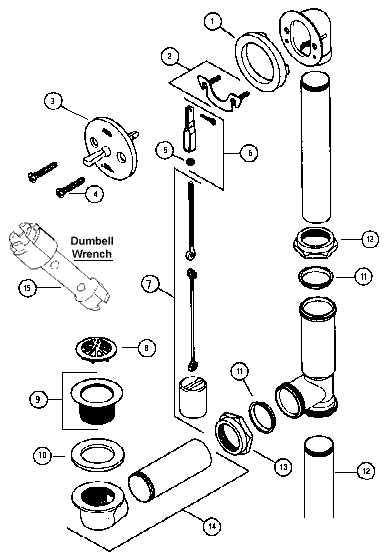
Note the dumbbell wrench shown at left — the drain key mentioned up top. It’s the tool that makes tub drain work possible, and it’s worth having before you start rather than halfway through. Keep a tub of plumber’s putty on the bench with it, because the strainer flange needs a fresh bead whenever it goes back in — the old one has dried and shrunk and will not reseal.
If the assembly is old enough that one gasket has given up, the rest are the same age and will follow it. Once you’ve gone to the trouble of getting access, swapping the entire waste and overflow as a kit costs a few dollars more than one gasket and saves you doing the whole job again in two years.
Getting Access
This is the part nobody mentions. On a tub against three walls, the drain assembly lives in a cavity you can’t see into.
If there’s an access panel — often in the closet or hallway behind the tub wall — start there. If there isn’t, you may be cutting one, and that’s a normal, expected thing to do. A neat 12x12 panel with a cover is far better than working blind.
On a tub on a slab with no access, the only route is through the tub itself, which is why drain repairs on slab installations get expensive.
Second-floor tubs can often be reached from the ceiling below, which is worth considering before cutting into a finished wall.
Bottom Line
The assembly is simpler than it looks from underneath: strainer into shoe, shoe and overflow into a tee, tee down through a tailpiece into the trap, trap out to the branch drain.
Get the drain key before you start. Identify your stopper type before ordering parts. And if the tub only leaks when it’s full, look at the overflow gasket before you tear anything else apart.
Keep Reading
Each part of the assembly above has its own page with the detail this one doesn’t have room for.
- Bathtub P-Trap Diagram — trap dip, weir and seal depth, and the three ways the seal disappears
- Bathtub Overflow Drain — How It Works — why its leaks go into the ceiling instead of the tub
- Tub Drain Assembly Parts Explained — the whole waste and overflow exploded and numbered
- Bathtub Drain Types — identify your stopper in two questions
- Bath Waste and Trap Fittings — slip, solvent, threaded and compression, and the rule for each
- Bathtub Rough-In Dimensions — where all of this goes before the tub is set
- Shower Drain Plumbing Diagram — the same job on the shower side
- How to Remove a Stuck or Broken Bathtub Drain — when the strainer will not turn
Common Questions
What size pipe is a bathtub drain?
One and a half inch. Sink drains are 1¼ inch and will not interchange, which is the reason a part that looks identical on the shelf turns out not to fit.
Does a bathtub need a P-trap?
Yes, always, and it is required by code. The water standing in the bend is the only thing between your bathroom and the sewer line.
Why does my tub gurgle when it drains?
Almost always a venting problem. Air cannot get into the drain line to replace the water leaving it, so it pulls air through the trap instead — which is also how trap seals get siphoned dry.
Can I replace just the stopper?
If you have lift-and-turn, toe-touch or push-pull, yes — they unscrew from the drain body. Trip-lever and pop-up stoppers are tied to linkage inside the overflow tube, so changing those is a bigger job.
How far below the tub does the trap sit?
Typically six to ten inches from the underside of the tub to the bottom of the trap bend, which is why tubs need either a joist bay or a slab recess beneath the drain end.
Why is my tub draining slowly?
Hair on the crossbars or in the shoe, most of the time. Beyond that, a partially blocked trap, a venting problem, or on a trip-lever tub a plunger adjusted so low that it is restricting the tee.