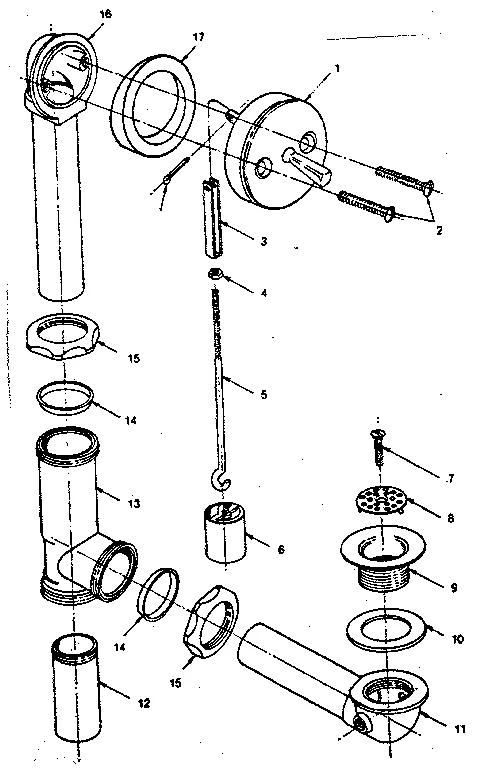
When a tub drain leaks and you finally get access to it, the thing you are looking at is more parts than expected. Here is the whole assembly taken apart and numbered.
If you already know you’re replacing rather than diagnosing, skip the shopping around: these are sold as a complete waste and overflow kit because the pieces only fit together as a matched set. Buying individual parts across brands is how people end up with a gasket that won’t seat.
A trip-lever waste and overflow, exploded. Numbering follows this manufacturer’s exploded view; the parts are the same across brands even where the numbering is not.
The Parts, Numbered
1. Overflow face plate. The visible cover on the tub wall, carrying the trip lever.
2. Face plate screws. Two, threading into the overflow ell behind the tub wall.
3. Upper lift linkage. The slotted rod hanging from the lever. The slot is the adjustment.
4. Adjusting nut. Sets where the lower rod hangs from the upper linkage. This is what you turn when the tub will not hold water.
5. Lower lift rod. Runs down the inside of the overflow tube to the plunger.
6. Plunger. The brass or plastic cylinder that drops into the tee to block the passage. This is the actual stopper on a trip-lever tub — there is nothing in the drain opening.
7. Strainer screw. Holds the strainer grid into the drain flange.
8. Strainer grid. The perforated disc you can see in the bottom of the tub.
9. Drain flange / strainer body. Threads down into the waste elbow, clamping the tub floor between them.
10. Flange gasket. Rubber gasket under the tub floor, between the tub and the waste elbow.
11. Waste elbow (drain shoe). The fitting under the tub that the flange threads into and the horizontal run leaves from.
12. Tailpiece. The short vertical drop from the tee to the trap.
13. Tee. Where the overflow tube and the horizontal run from the shoe meet. The arrow on it points down.
14. Slip washers. Tapered washers sealing the slip joints. There are several.
15. Slip nuts. The nuts that compress those washers.
16. Overflow ell. The fitting behind the tub wall that the face plate screws into.
17. Overflow gasket. Between the ell and the outside of the tub wall. Beveled — the bevel faces the tub.
Grouping Them by What They Actually Do
Seventeen parts is a lot to hold in your head. There are really only four groups.
The linkage group (1–6). Everything to do with opening and closing. Lives inside the overflow tube, comes out as one assembly through the overflow opening, and is the group that gets adjusted rather than replaced.
The strainer group (7–10). Everything at the tub floor. This is what you see and what hair collects on.
The waste group (11–13, 16). The fittings that carry water. Structural, in the sense that everything else hangs off them.
The sealing group (14, 15, 17). Gaskets and nuts. These are what fail, and they fail on age rather than use.
The Parts That Actually Fail
Nothing in that list wears out from being used. The failures are age and installation.
Overflow gasket (17). Hardens, stops conforming to the tub wall, and leaks — but only when the tub is filled deep enough to reach the plate. This is the classic cause of a stain on the ceiling below a bathroom.
Flange gasket (10). Same failure, lower down. Leaks whenever the tub holds any water at all.
Plumber’s putty under the strainer (9). Dries and shrinks over decades. Slow seep around the drain body.
Slip washers (14). Harden, or were installed backwards in the first place.
Linkage adjustment (4). Not a failure at all — the assembly drifts and the tub stops holding water. Adjustment, not replacement.
Strainer crossbars. Broken by someone attacking a stuck drain with pliers instead of a drain key. Once they are gone, the flange has to be extracted a much harder way.
The bathtub overflow drain page has the two-minute test for telling the first two apart without opening anything.
Brass or PVC
Both are code-compliant. The choice is about the situation.
Brass uses compression joints with ferrules. It is more forgiving of a slightly out-of-square installation, it survives being taken apart and put back together, and it lasts decades. Heavier and more expensive. Worth it when the assembly is genuinely hard to reach again, or visible under a clawfoot tub.
PVC is lighter, cheaper, and joins with slip nuts or solvent cement depending on the kit. Perfectly good, and what most new construction uses. Less forgiving of misalignment because the plastic will not take up any slop.
Avoid the very thin chrome-plated tubular kits sold cheaply at big-box stores. They corrode through at the bottom of the bend and at the tee, usually within ten years, and they look identical to good brass on the shelf.
Buying: Kit or Pieces
The honest answer is almost always the kit.
Getting access to a tub drain assembly is the entire cost of the job. The parts are cheap, the labour and the access panel are not. Once you are in there with the assembly exposed, the marginal cost of replacing everything instead of one gasket is small, and it means you are not doing this again in two years when the next gasket of the same age gives up.
The exception is when the fittings are sound and only the rubber has aged, which is common on an otherwise healthy brass assembly. In that case a gasket and washer set covers parts 10, 14 and 17 for a few dollars.
Either way, get a drain key before you start. It is the one tool with no substitute — pliers on the strainer crossbars snap them, and part 9 then has to come out the hard way.
Assembly Order and the Two Details That Matter
Working from the tub outward:
- Waste elbow and gasket up under the tub floor, gasket bevel toward the tub.
- Strainer flange down through the tub floor into the elbow, with putty or the supplied gasket at its face.
- Overflow ell and gasket against the outside of the tub wall.
- Tube down from the ell to the tee, tee arrow down.
- Horizontal run from the elbow into the tee.
- Tailpiece from the tee to the trap.
- Linkage in through the overflow opening, plate on.
Detail one: the tee arrow points down. There is a baffle cast into the tee, and inverted it fights the flow. The assembly will leak regardless of how well everything else is fitted, and finding it means taking the whole thing apart again.
Detail two: putty in one place only. Under the strainer flange, and only if the kit does not supply a rubber gasket for that face. Never on the shoe gasket — that joint seals on rubber, and putty stops the rubber from seating. Doing both is worse than doing either.
Adjusting the Linkage
If the tub will not hold water, or drains too slowly, this is almost always it — and it costs nothing.
Pull the two plate screws, lift the whole linkage assembly out through the overflow opening, and find the threaded adjustment at part 4.
Lengthen the rod and the plunger drops further into the tee. Better seal, slower drain. Shorten it and the plunger lifts clear. Faster drain, may not hold.
Two tries usually gets it. Go a few threads at a time and reinstall to test — the adjustment is more sensitive than it looks.
Bottom Line
Seventeen parts, four groups, and only the gaskets and the linkage adjustment ever actually cause trouble.
If you have access to the assembly, replace the whole waste and overflow rather than one gasket — the parts are cheap and the access is not. Get the tee arrow pointing down, put putty in exactly one place, and adjust the linkage before you assume anything is broken.
Keep Reading
- Bathtub Drain Diagram: Every Part, Labeled and Explained — the same assembly, installed rather than exploded
- Bathtub Overflow Drain — How It Works — the two-minute test for which gasket is leaking
- Bathtub Drain Types — which stopper hardware you have
- Bath Waste and Trap Fittings — slip, solvent, threaded and compression, and the rule for each
- How to Remove a Stuck or Broken Bathtub Drain — when the flange will not turn
Common Questions
What is a waste and overflow assembly?
It is the complete set of parts that takes water out of a bathtub — the strainer in the tub floor, the shoe under it, the overflow fitting on the tub wall, the tube between them, the tee where they meet, and the tailpiece down to the trap. It is sold as one kit because the parts only fit together as a set.
Should I replace the whole tub drain assembly or just one part?
If a gasket has hardened, the others are the same age and will follow it. Once you have access — which is the hard part of the job — replacing the full waste and overflow costs a little more in parts and saves going back in twice. Replace a single part only when the assembly is genuinely young and something specific broke.
What is the difference between brass and PVC waste and overflow kits?
Brass uses compression joints with ferrules and is what you find in older homes and better installations; it is more forgiving of slight misalignment and lasts longer. PVC is lighter, cheaper, and joins with slip nuts or solvent cement. Both are code-compliant. Brass is worth it where the assembly is visible or hard to reach again.
What size is a tub drain assembly?
One and a half inch throughout. Sink assemblies are 1¼ inch and use the same shaped parts at a smaller size, which is why the two get confused on a shelf and why sink parts will not work on a tub.
Why does my tub drain leak at the strainer?
The plumber's putty under the strainer flange has dried and shrunk, or the gasket between the shoe and the underside of the tub has hardened. Both show up the same way — a slow leak whenever the tub holds water, appearing under the tub rather than in it.
Do I need plumber's putty on a tub drain?
Under the strainer flange, yes, unless the manufacturer supplies a rubber gasket for that face instead — some kits do, and using both is worse than using either. Never put putty on the gasket between the shoe and the tub; that joint seals on rubber and putty prevents it from seating.
Replace the whole thing or one part?
The whole thing, once you have access. Access is the expensive part, not the parts.
Which way does the tee go?
Arrow down. Always.