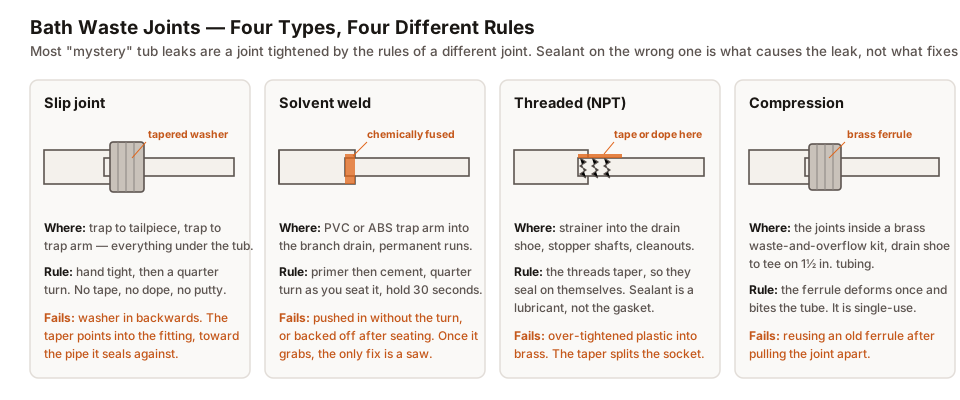
Most tub leaks that get described as mysterious are not mysterious. They are a joint tightened by the rules of a different joint.
There are four joint types under a bathtub, each with its own sealing mechanism, and applying the wrong technique is what causes the leak — not what fixes it.
The single most useful thing to have before you crawl under there is a bag of assorted slip joint washers. A hardened or backwards washer is the cause of most tub leaks people describe as mysterious, and having the right taper already in your hand beats making a second trip in the middle of the job.
Slip Joints — Where Most Tub Work Happens
Everything under the tub that has a plastic or chrome nut on it is a slip joint: trap to tailpiece, trap to trap arm, the connections either side of the tee.
How it seals. A tapered washer sits between the pipe and the fitting, and the nut squeezes it into the taper of the socket. The washer does the work. The nut is only there to hold it in position.
The rule. Hand tight, then a quarter turn with pliers. No tape, no pipe dope, no putty.
The way it fails. The washer goes in backwards. The taper points into the fitting, toward the pipe it seals against — narrow end leading. Reversed, the flat face lands where the taper should be, and the joint weeps forever regardless of how hard the nut is turned.
That failure is worth dwelling on because it produces the exact behaviour that makes people over-tighten: a small drip that gets slightly better as you tighten, then never stops. Every quarter turn improves it a little and none of them fix it, and eventually the nut cracks.
Solvent Weld — Permanent by Design
PVC and ABS drain lines join by solvent welding. This is not glue. The solvent softens both surfaces and they fuse into a single piece of plastic.
How it seals. There is no seal. There is one part where there used to be two.
The rule. Primer, then cement, then push and give a quarter turn as you seat it. Hold for thirty seconds — the parts will push themselves back apart if you let go too early, and a joint that backed off before it set will leak.
Where it belongs. The trap arm into the branch drain, and any permanent run. Not anywhere you may reasonably want to take apart.
The way it fails. Pushed straight in with no turn, so the cement never spreads evenly around the socket. Or seated and released early.
Primer or no primer. No-primer cements exist and work fine for accessible work. For a joint that is going behind a wall or under a floor, use primer. The extra minute buys a joint you never think about again.
Threaded (NPT) — Sealing on the Taper
The strainer into the drain shoe, stopper shafts, cleanout plugs. Anything that screws.
How it seals. NPT threads are tapered, so they wedge tighter as they go and seal against themselves. The tape or dope is a lubricant that lets the threads pull up further before they bind — it fills the helical gap, but it is not the gasket.
The rule. Two or three wraps of tape in the direction of tightening, or a light coat of dope. Then tighten until it is firm, not until it stops.
The way it fails. Over-tightening plastic into brass. The taper acts as a wedge, and a plastic female fitting will split rather than stop. The crack is often invisible until the joint is under water.
Also worth knowing: tape is not a fix for a bad thread. If a joint needs four wraps to hold, something is damaged.
Compression — One Chance
Brass waste and overflow kits use compression joints: a nut, a brass ferrule (sometimes called an olive), and the tube.
How it seals. Tightening the nut drives the ferrule into the taper of the fitting and it deforms permanently, biting into the tube. Metal to metal.
The rule. Snug, then a turn to a turn and a half. Firm, not violent.
The way it fails. Reusing an old ferrule. It deformed once, into one specific position on one specific tube. Take the joint apart and the ferrule cannot re-seat the same way, so it weeps.
Ferrules cost pennies. Replace them whenever a compression joint comes apart, and do not attempt to slide a used one further down the tube to find fresh metal — it will not.
The Sealant Question, Settled
Sealant belongs on exactly one of the four.
| Joint | Sealant? |
|---|---|
| Slip | No. Washer seals. |
| Solvent weld | No. Cement is the joint, not a sealant. |
| Threaded (NPT) | Yes — tape or dope, as a lubricant. |
| Compression | No. Ferrule seals. |
Plumber’s putty is a fifth thing and belongs in a fifth place: under the strainer flange at the tub floor, unless the kit supplies a rubber gasket for that face instead. Using both is worse than using either, because the putty stops the rubber seating.
Silicone belongs on none of them. Silicone on a drain joint is a sign something is misaligned, and it buys a few months before the same joint leaks from behind a layer of silicone that now has to be scraped off.
Diagnosing by When It Leaks
The four joints sit at different heights and see water at different times, which makes them separable without taking anything apart.
Only when the tub is filled past the overflow plate → the overflow gasket, up high.
Whenever the tub holds any water → the shoe gasket under the tub floor, or the putty under the strainer.
Only while draining, dry when empty → slip joints at the trap. Nothing down there sees water until water is moving.
Constantly, with the tub dry → not the waste assembly at all. Look at the supply side, the valve, or the tile.
That sequence saves cutting an access panel in the wrong wall.
Tools and Consumables
Very little is needed, and none of it is expensive.
Add the washers mentioned up top, a few brass ferrules if any part of the assembly is compression-fitted — they are single-use and you will need fresh ones the moment a joint comes apart — and primer and cement if a PVC joint is going somewhere you can’t reach again.
That is genuinely the whole list. Nothing under a bathtub costs much; the expensive part is getting to it.
Working in the Space You Actually Have
None of this is difficult in a workshop. Under a tub, through a twelve-inch hole, lying on your side, it is a different job.
Assemble as much as possible outside the space. Slip joints can be started loose and positioned, then tightened.
Alignment first, tightening second. A joint pulled into place by the nut will leak. If the pipes are not naturally lining up, fix that before tightening anything — slip joints in particular have almost no tolerance for being used as a clamp.
Test with the tub full, not with a trickle. A joint that holds a running tap can still fail under the weight of a full tub draining at once.
Bottom Line
Four joints, four mechanisms, one rule each. Slip joints seal on a tapered washer that points into the fitting and needs a quarter turn past hand tight. Solvent welds fuse and need a quarter turn as they seat. Threaded joints seal on their own taper and take tape as a lubricant. Compression ferrules deform once and are single-use.
Get those four right and there is very little left under a bathtub that can leak.
Keep Reading
- Tub Drain Assembly Parts Explained — every part these joints connect, numbered
- Bathtub Drain Diagram: Every Part, Labeled and Explained — the assembly in place
- Bathtub P-Trap Diagram — the fitting with the most slip joints on it
- Bathtub Overflow Drain — How It Works — the leak that only appears in a deep tub
- How to Remove a Stuck or Broken Bathtub Drain — when a threaded joint has decided otherwise
Common Questions
Do you use Teflon tape on a slip joint?
No. A slip joint seals on a tapered nylon or rubber washer, and tape does nothing there except make the nut feel tighter than it is. The same goes for pipe dope and plumber's putty. If a slip joint needs sealant to hold, the washer is in backwards, damaged, or the pipes are not aligned.
How tight should a slip joint nut be?
Hand tight, then about a quarter turn with pliers. That is genuinely all. Slip nuts are not compression fittings — past that point you are deforming the washer past the shape that seals, and the joint gets worse the harder you crank it.
Which way does a slip joint washer face?
The taper points into the fitting, toward the pipe it seals against — narrow end first. Installed backwards it will weep no matter how tight the nut is, and it is the single most common cause of a joint that will not stop dripping after a repair.
Can I reuse a compression ferrule?
No. A brass ferrule deforms once, biting into the tube to make the seal, and it takes the shape of the position it was in. Pull the joint apart and put it back and it will not re-seat the same way. Ferrules are cheap; replace them whenever a compression joint comes apart.
Do I need primer before PVC cement?
For a drain joint that will be inaccessible behind a wall or under a floor, yes. Primer softens the surface so the cement can chemically fuse the two parts rather than glue them. Some cements are sold as no-primer-needed and are fine for accessible work, but on a joint you cannot reach again the extra step is cheap insurance.
Why does my tub drain leak only when the tub is draining?
Nothing under a tub is under pressure until water moves through it, so a joint that only weeps during drainage is almost always in the trap or the slip connections either side of it. Start with the slip nuts — hand tight plus a quarter turn, washers taper-in — before you suspect anything more serious.
What about silicone?
Not on any of the four. If a joint needs silicone, it is misaligned.