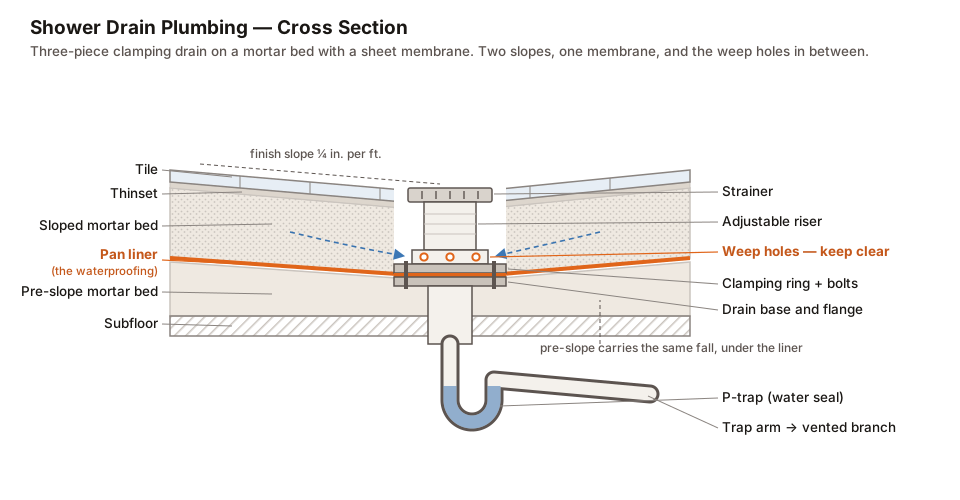
A shower drain is built from the bottom up, and the order matters more than the skill. Almost every failed shower failed because one step happened after a step it should have preceded.
Before anything else, buy the drain body — and buy the right one. Shower drain assemblies come in three incompatible types, and the one you need is decided by your waterproofing method, not the other way around. Step 1 below sorts that out. Everything after it depends on getting this part right.
This is the finished assembly. Everything below is how to get there.
Step 1 — Decide the System First
Before any pipe is cut, pick the waterproofing method, because it determines which drain body you buy.
Traditional sheet liner → a three-piece clamping drain with weep holes. Two mortar beds.
Bonded membrane — sheet or liquid — → a bonded-flange drain. One bed. No weep holes, because water never gets into the assembly.
Curbless or large-format tile → likely a linear trough, single-plane slope.
These are not interchangeable, and finding that out after the tile is set is the most expensive mistake in the whole job. The differences are laid out in the shower drain plumbing diagram.
The rest of this walks through the traditional clamping build, because it is the one with the most steps to get wrong.
Step 2 — Trap, Trap Arm and Vent
This is the part where code lives.
Two-inch pipe. Showers use 2”, not the 1½” a tub uses. If you are converting a tub to a shower, the existing line is undersized and it will pool at your feet.
A P-trap directly under the drain, and a trap arm running to the vented branch with a quarter inch of fall per foot.
The vent has to be close enough. There is a maximum developed length from the trap weir to the vent, and for 2” pipe it is not generous. Relocating a shower even a few feet during a remodel routinely puts it past the limit, and past the limit the trap siphons dry every time you use it — sewer smell, no leak, nothing to find.
The vent connects above the trap weir. A takeoff below that is not a vent.
Step 3 — Set the Drain Base and Dry-Fit
The drain base sits on the subfloor with the body dropping into the trap. Fasten it down per the manufacturer’s instructions.
Now do the arithmetic that decides how the finished shower looks. Work out the finished floor height at the drain — subfloor, pre-slope thickness, liner, top bed, thinset, tile. The adjustable riser has to end up putting the strainer flush with the tile.
Dry-lay one tile beside the drain on a bed of the thinset you will actually use, measure to the top of it, and note the number. You will set the riser to that at the end, but knowing it now tells you whether your bed thicknesses are realistic.
Step 4 — The Pre-Slope
The step that gets skipped, and the one that cannot be added later.
Float a mortar bed over the subfloor sloping a quarter inch per foot from the perimeter down to the drain base. It should be thickest at the walls and thinnest at the drain.
Its job is not to support the tile. Its job is to make sure water that eventually lands on the liner above it runs somewhere.
Why people skip it: the shower works fine without it. The floor still slopes, the water still drains, and nothing appears wrong. What is wrong is that everything soaking through the tile now pools in a flat basin under the shower for the rest of its life.
Let it cure before you go on.
Step 5 — The Liner
Lay the sheet liner over the cured pre-slope, up the walls at least a few inches above the curb height, and over the curb.
Do not fasten it below the top of the curb. Every staple below that line is a hole in the waterproofing at a level water will reach. Fasten only along the top edge, well above where water can get.
Corners get folded, not cut. Preformed corners exist and are worth using. A cut corner is a leak with a schedule.
Cut only the drain opening, at the drain, following the base’s bolt pattern.
Step 6 — Clamp the Drain
Seat the liner over the drain base, line up the bolt holes, put the clamping ring on top, and tighten evenly in a cross pattern.
Even is the operative word. Tightening one side down first pulls the liner out of position and puts a wrinkle across the seal.
The liner is now sandwiched between the base flange and the clamping ring. That sandwich is the waterproof connection between the membrane and the drain, and it is the reason a clamping drain cannot be used with a membrane that terminates somewhere else.
Step 7 — Protect the Weep Holes
Look at the collar just above the flange. Those small openings are the exit for everything the liner catches.
Before the top bed goes in, put a small handful of clean pea gravel or a few broken tile chips around the drain base. That maintains a void water can move through and keeps wet mortar from packing into the holes.
This takes thirty seconds and it is the difference between a shower that lasts and one that quietly saturates.
Step 8 — Top Bed, Tile, and the Strainer
Float the top mortar bed over the liner, sloping a quarter inch per foot to the drain — the same fall as the pre-slope, now above the membrane.
Tile it.
Then set the adjustable riser so the strainer sits flush with the finished tile. Not the mortar. Not the thinset. The tile.
Too high and you have a lip water has to climb, which means a permanent ring of standing water around the drain. Too low and the tile edges stand above the strainer, water sheets past, and you get the same puddle in a different shape.
Tools and Materials
Beyond the drain body, a traditional build needs sheet pan liner — buy preformed corners with it, because a folded corner is fine and a cut one is a leak with a schedule — plus a 2-inch trap, mortar, and clean pea gravel for the weep holes.
The tool that matters most is a level long enough to reach from the drain to the curb. Slope is the entire job and it cannot be eyeballed.
Testing Before You Tile
Two tests, both worth doing.
Flood test the liner. Plug the drain, fill the pan to just below the top of the curb, mark the level, and leave it for 24 hours. If the level drops or anything appears below, the liner is not sealed. This is the last moment it is cheap to find out.
Check the slope with water, not just a level. Pour a bucket across the pan and watch where it goes. Flat spots show up immediately and are invisible to a straightedge.
Do both before the top bed, not after.
Bottom Line
The order is the job. Pre-slope before liner, liner before clamp, gravel before mortar, tile before you set the strainer height.
Flood test the liner before anything covers it, and put a handful of gravel around the drain base — thirty seconds of work that decides whether the shower is still dry in fifteen years.
Keep Reading
- Shower Drain Plumbing Diagram — the finished assembly, labeled, and the three drain systems compared
- Bathtub P-Trap Diagram — what happens inside the bend, and why venting decides whether it survives
- Bathtub Rough-In Dimensions — the same planning stage on the tub side
- Bath Waste and Trap Fittings — the joints you will make under the pan and the rule for each
- Best Way to Remove Mold and Mildew from Tile Grout — what a shower that stays wet eventually tells you
Common Questions
What order do you plumb a shower drain in?
Rough plumbing first — trap and trap arm to the vented branch, with the drain base set at the right height. Then the pre-slope mortar bed. Then the pan liner, up the walls and over the curb. Then clamp the drain. Then the top mortar bed with the weep holes protected. Then tile, and the strainer set flush with it. Getting the pre-slope out of order is the mistake that cannot be fixed afterwards.
Do I need a pre-slope under a shower pan liner?
On a traditional sheet-liner shower, yes, and it is not optional. Water gets through tile and grout by design, soaks down through the mortar bed, and lands on the liner. If the liner is flat, that water sits there permanently. The pre-slope is what carries it to the weep holes.
How do you keep mortar out of shower drain weep holes?
Put a small handful of clean pea gravel or a few broken tile chips around the base of the drain before floating the top mortar bed. That keeps a void the water can travel through and keeps wet mortar from packing into the openings.
How high should a shower drain be set?
The strainer should finish flush with the finished tile, not with the mortar bed. Dry-lay a tile beside the drain with its thinset bed accounted for, measure to the top of it, and set the adjustable riser to that. Too high gives you a permanent puddle ring around the drain; too low and water sheets past it.
How far can a shower trap be from the vent?
There is a code limit on developed length from the trap weir to the vent and it depends on pipe size. For the two-inch pipe a shower uses it is short enough to catch people who relocate a shower during a remodel. Past that limit the trap siphons itself dry every time the shower runs.
Can I plumb a shower drain myself?
The assembly work is well within reach of a competent DIYer. The part that is not is the connection into the existing drain and vent system, because that is where the code requirements and the consequences live. A common split is to have a plumber set the trap and prove the vent, then build the pan yourself.
What if I already tiled and forgot the pre-slope?
There is no repair that adds a slope under a membrane that is already buried. The honest answer is that it comes out.