A shower drain is not a hole with a pipe under it. It is a small waterproofing system with a drain running through the middle, and the parts that cause the most expensive failures are the ones you cannot see once the tile goes on.
If you’re shopping right now, the decision that matters is which of the three drain bodies you need — shower drain assemblies are not interchangeable, and buying the wrong one for your waterproofing method is the mistake you discover after the tile is set. The section below on the three systems tells you which is yours in about a minute.
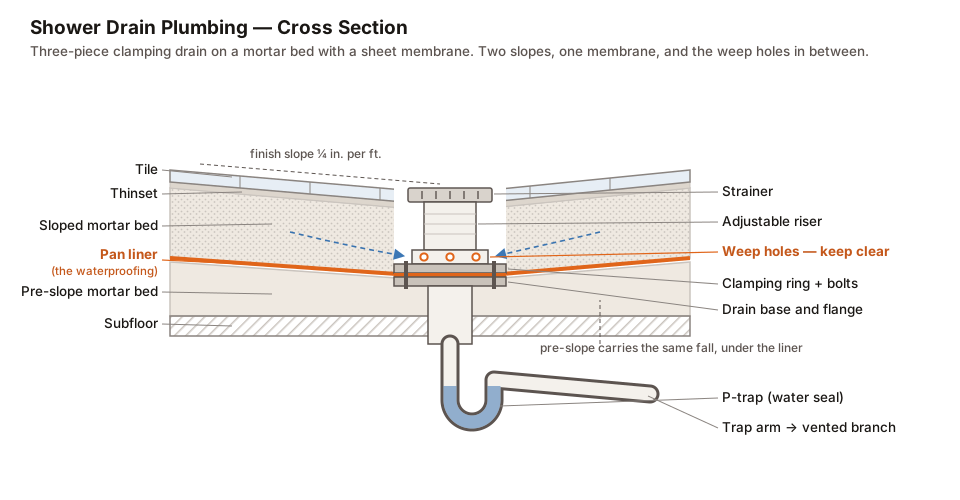
Here is the whole thing in section, labeled.
A three-piece clamping drain on a traditional mortar bed. Note the two separate slopes and the membrane between them.
Reading the Diagram From the Top Down
Tile and thinset. The finished surface. It is not waterproof and was never meant to be — grout absorbs water and so does most thinset.
Top mortar bed. The sloped bed the tile is set on. A quarter inch of fall per foot toward the drain.
Pan liner. The waterproof membrane, usually a sheet of PVC or CPE on a traditional build. This is the actual waterproofing. Everything above it is expected to get wet.
Pre-slope. A second mortar bed underneath the liner, sloped the same way. Its whole purpose is to make sure water landing on the liner runs to the drain rather than pooling in a low spot.
Subfloor. Plywood or slab.
Running down through all of it is the drain: a strainer at the top, an adjustable riser that lets you set the height to match your finished tile, a collar with weep holes, a clamping ring and a drain base that sandwich the liner, and then the body dropping to the trap.
The Two Slopes Nobody Expects
The single most common mistake in a traditional shower is building one slope instead of two.
It seems reasonable. The floor slopes to the drain, water runs to the drain, done. But tile and grout are porous. Water gets through them constantly and by design. It soaks into the mortar bed, works down, and lands on the liner.
If the liner is dead flat, that water sits there. Forever. You end up with a permanently wet bed under a shower that looks perfectly fine, and eventually you get the smell, then the efflorescence in the grout, then the failure.
The pre-slope is what carries that water to the drain. It is under the liner, invisible in the finished shower, and it is the part that gets skipped because the shower works fine without it — for about three years.
Weep Holes, and Why Grout Kills Them
Look at the collar on the drain body just above the flange. There are small openings in it. Those are the weep holes, and they are the exit for the water that just travelled down through the mortar bed to the liner.
Two ways they get destroyed:
Mortar packed against them. When the top bed is floated, wet mortar gets pressed right up to the drain and plugs the holes.
Grouted over. Less common but it happens on repairs.
The standard prevention is pea gravel — a small handful of clean gravel or a few broken tile chips placed around the drain base before the top bed goes in. It keeps a void the water can move through and keeps the mortar off the openings.
The Three Drain Systems
Buying the wrong drain body for the waterproofing you plan to use is the most expensive mistake in a shower build, because you find out after the tile is set.
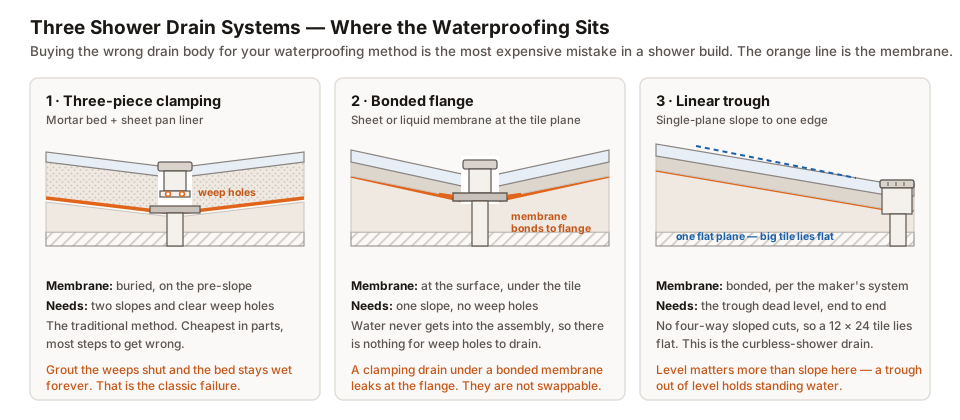
Three-piece clamping. The traditional method. Sheet liner clamped between two flanges, two mortar beds, weep holes. Cheapest in parts and the most steps to get wrong.
Bonded flange. The membrane — sheet or liquid-applied — bonds directly to a flange up at the tile plane. Water never enters the assembly, so there is nothing for weep holes to drain and the drain body does not have any. One slope, not two.
Linear trough. A long trough at one edge or wall. The floor becomes a single flat plane pitched one direction, which is why large-format tile works on a linear-drain shower and does not on a center-drain one. This is the standard drain for curbless showers.
These are not interchangeable. A clamping drain under a bonded membrane leaks at the flange, because the waterproofing terminates at a height the drain was never designed to seal at.
Below the Floor: Trap and Vent
Under the drain body, a shower is plumbed like everything else.
Two-inch pipe. Showers use 2” where a tub uses 1½”. More water spread over a wider area, so it needs the extra capacity. This is exactly why a tub-to-shower conversion is not a drop-in — leave the old 1½” line in place and the new shower will pool.
A P-trap. Required, always. The standing water in the bend is what keeps sewer gas out of the bathroom.
A vent, close enough to matter. The trap arm runs from the trap to the vented branch. If it runs too far before it reaches that vent, the shower siphons its own trap dry every time you use it, and you get a smell with no leak and nothing visibly wrong. Codes cap that distance, and for 2” pipe the limit is short enough that it catches people who move a shower during a remodel.
For a full breakdown of what happens inside the bend, see the bathtub P-trap diagram — the trap on a shower works exactly the same way.
Setting the Drain Height
The adjustable riser is the part that decides whether your shower looks professional.
The strainer should sit flush with the finished tile, not the mortar bed. That means you need to know your tile thickness and your thinset bed before you set the height, and the order matters: dry-lay a tile next to the drain, measure, then set the riser.
Set it too high and there is a lip of drain standing proud of the floor that water has to climb over — you get a permanent puddle ring. Set it too low and the tile edges around the drain sit above the strainer, water sheets past it, and you get the same puddle in a different place.
Tools and Parts
Most of a shower drain job is bought at the point of no return, so it is worth getting the parts staged before the mortar goes in.
On a traditional build that means the drain body, a sheet pan liner with preformed corners, and a 2-inch trap — all of it bought before the first bag of mortar is mixed, because the order of operations gives you no chance to go back.
The one tool worth more than any of it is a level long enough to reach from the drain to the curb. Slope is the entire job here, and eyeballing a quarter inch per foot does not work.
Diagnosing an Existing Shower
If the shower is already built, you can still work out a fair amount from the outside.
Standing water after every shower. Slope problem or drain set too high. Check whether the puddle is at the drain (drain too high) or away from it (flat spot in the floor).
Smell, drains fine. Trap seal, not the drain. Evaporation if it comes back slowly, venting if it comes back immediately.
Gurgling. Venting. Air cannot get into the line to replace the water leaving, so it pulls it through the trap.
Efflorescence — white crust in the grout. Water moving through the assembly and depositing minerals as it evaporates. Often the first visible sign of a saturated bed or blocked weep holes.
Damp ceiling below a second-floor shower. Could be the drain connection, could be the liner, could be the trap. The order to check is trap joints first — they are accessible and they are the most common — then the drain-to-liner seal.
Bottom Line
The visible part of a shower drain is the least important part of it. Water is supposed to get past the tile — the liner catches it, the pre-slope carries it, and the weep holes let it out. Break that chain anywhere and the shower still works for a few years, then fails in a way that costs the whole floor.
Match the drain body to your waterproofing method, build two slopes if you are using a sheet liner, keep the weep holes clear with a handful of gravel, and set the strainer flush with the finished tile rather than the mortar.
Keep Reading
- Bathtub Drain Diagram: Every Part, Labeled and Explained — the tub equivalent of this page
- Bathtub P-Trap Diagram — what happens inside the bend, and the three ways the seal is lost
- How to Plumb a Shower Drain — the same assembly, in build order
- Bath Waste and Trap Fittings — slip, solvent, threaded and compression joints, and the rules for each
- Best Way to Remove Mold and Mildew from Tile Grout — for when the shower is already telling you something
Common Questions
What are the weep holes in a shower drain for?
They let water that soaks through the mortar bed reach the drain instead of sitting on the pan liner. The liner is not the top of the assembly — water gets past the tile and grout by design, travels down through the bed, lands on the liner, and needs a way out. If the weep holes are plugged with mortar or grout, that water has nowhere to go and the bed stays permanently saturated.
Does a shower drain need a P-trap?
Yes, and it is required by code. The water standing in the bend is the only barrier between your bathroom and the sewer line. A shower with no trap, or with a trap that has dried out, will smell — usually within a few weeks in a guest bathroom that never gets used.
What size pipe is a shower drain?
Two inches. A bathtub uses 1½ inch, which is why a tub-to-shower conversion is not a straight swap — a shower moves more water through a wider footprint and the smaller line cannot keep up, so it pools at your feet.
How much slope does a shower floor need?
A quarter inch of fall per foot, from the perimeter to the drain. On a traditional mortar-bed shower you need that same fall twice: once in the pre-slope under the liner, and again in the top bed above it.
Can I use a clamping drain with a bonded waterproofing membrane?
No. A clamping drain seals a sheet liner between two flanges partway down the assembly. A bonded membrane seals at the tile plane and needs a drain with a bonding flange up at that level. Mixing them puts the waterproofing and the seal at different heights, and the joint leaks.
Why does my shower drain smell even though it drains fine?
Almost always a lost trap seal — evaporation in a shower nobody uses, or siphoning caused by a trap arm that runs too far before it reaches a vent. Run the water for thirty seconds. If the smell goes and comes back in a week or two, it is evaporation. If it comes back the same day, it is a venting problem.
Can I fix blocked weep holes without tearing out the shower?
Rarely, and not reliably. If the drain is accessible from below you have options; if it is not, the honest answer is that the assembly has to come apart.